Discover essential Roblox animation tips to create smooth and realistic character movements, enhancing your game's visual appeal and player immersion through effective keyframing and animation principles.
Por: Pedro Bongiovani em 21 de outubro de 2025
Anúncios
Achieve professional-grade Roblox animations by mastering keyframe techniques, easing, and fundamental animation principles to bring your characters to life with fluid and realistic movements.
Are you ready to elevate your Roblox game development and make your characters move with unparalleled grace and realism? Mastering Roblox Animation Tips: Create Smooth and Realistic Movements for Your Characters is not just about making things move; it’s about breathing life into your creations, making them feel responsive, and truly immersing players in your virtual worlds. This guide will take you through the essential techniques and principles that professional animators use to achieve stunning results.
Understanding the Basics of Roblox Animation
Before diving into complex techniques, it’s crucial to grasp the foundational elements of Roblox animation. Roblox Studio provides powerful tools, but understanding how they work in conjunction with animation principles is what truly makes a difference. We’ll start with the building blocks before moving to more advanced concepts.
Animation in Roblox Studio primarily revolves around keyframes. A keyframe marks a point in time where a character part is in a specific position or orientation. By defining these keyframes, the animation system interpolates the movement between them, creating the illusion of motion. The quality of this interpolation and the thoughtful placement of keyframes are paramount to achieving smooth and realistic results.
The Animation Editor in Roblox Studio
The Animation Editor is your primary workspace for creating animations. Familiarizing yourself with its interface and functionalities is the first step. It allows you to select character parts, set keyframes, and preview your animations in real-time. Understanding its layout and various controls will significantly streamline your workflow.
Timeline: This displays your animation’s duration and where each keyframe is placed.
Dope Sheet: Offers a detailed view of individual property curves for each animated part.
Transform Tools: Used to manipulate the position, rotation, and scale of character parts.
Playback Controls: Allow you to play, pause, and scrub through your animation.
Beyond the basic tools, the Animation Editor also offers options for managing animation events and looping, which are critical for interactive and continuous movements. Experimenting with these features will provide a deeper understanding of their impact on your final animation.
In conclusion, a solid grasp of the Roblox Animation Editor and the concept of keyframes forms the bedrock of all your future animation endeavors. Spending time exploring these fundamental aspects will pay dividends as you progress to more intricate animation techniques.
Mastering Keyframes and Easing for Fluid Motion
The heart of smooth animation lies in the precise placement and intelligent manipulation of keyframes, combined with effective easing techniques. Easing dictates how a character part accelerates and decelerates between keyframes, directly impacting the naturalness of the movement. Without proper easing, animations can appear robotic and unnatural.
Think of keyframes as the extreme poses in an animation, and easing as the invisible force that guides the movement between those poses. A character jumping, for instance, needs to ease out as it leaves the ground and ease in as it lands to convey the effect of gravity and momentum accurately.
Types of Easing and Their Applications
Roblox Studio offers various easing styles, each suited for different types of motion. Choosing the right easing style is crucial for conveying the intended feeling of an action. Incorrect easing can make a powerful movement feel weak or a gentle movement feel abrupt.
Linear: Constant speed, often used for mechanical or non-organic movements.
Ease In: Starts slow and speeds up, useful for objects gaining momentum.
Ease Out: Starts fast and slows down, ideal for objects coming to a stop.
Ease In/Out: Starts slow, speeds up, and then slows down, mimicking natural organic movement.
Beyond these basic types, you can also manipulate the easing curves directly in the Dope Sheet, offering even finer control over acceleration and deceleration. This advanced control allows animators to create highly customized and expressive movements that truly stand out. Don’t be afraid to experiment with these curves; small adjustments can lead to significant improvements in fluidity.
Effectively mastering keyframes and easing is a skill developed through practice and observation. Pay close attention to how real-world objects and characters move, and try to replicate those nuances using the tools available in Roblox Studio. This iterative process of observation, application, and refinement is key to achieving truly fluid motion.
Applying the 12 Principles of Animation to Roblox
The 12 Principles of Animation, originally developed by Disney animators, are timeless guidelines that can drastically improve the quality and realism of any animation, including those created in Roblox. While not all principles may be directly applicable or easily implemented in every Roblox project, understanding their core concepts will elevate your work significantly.
These principles aren’t just rules; they are observations of how motion works in the real world and how to best convey emotion and intent through movement. Incorporating even a few of these principles can transform a stiff animation into a lively, engaging one.
Key Principles for Roblox Animators
Let’s focus on a few principles that are particularly impactful for Roblox game development. Applying these will immediately make your character movements more believable and appealing to players.
Squash and Stretch: Gives a sense of weight and flexibility to objects. A character jumping might squash slightly before launching and stretch in mid-air.
Anticipation: Preparing the audience for an action. Before a character punches, they might pull their arm back slightly, creating anticipation.
Staging: Presenting an idea clearly. Ensure the character’s actions are easy to understand and not obscured.
Follow Through and Overlapping Action: Parts of a body or clothing continuing to move after the main action has stopped, or moving at different rates. This adds realism and fluidity.
Arcs: Most natural motion follows an arc. Limbs and objects should move in slightly curved paths, not straight lines.
Implementing these principles requires careful planning and attention to detail. It’s not about exaggerating every movement, but rather about subtly incorporating these ideas to enhance the believability of your animations. Practice observing how these principles manifest in real-world actions and then try to translate them into your Roblox creations.
By consciously applying these fundamental principles, your animations will transcend simple keyframe interpolation, becoming more expressive, dynamic, and ultimately, more realistic. It’s an ongoing learning process that refines your artistic eye and technical skill.
Optimizing Walk Cycles and Character Locomotion
Walk cycles and other forms of character locomotion are perhaps the most frequently animated actions in any game, making their optimization crucial for a polished player experience. A poorly animated walk cycle can quickly break immersion, while a well-crafted one can make a character feel genuinely alive.
Creating a convincing walk cycle involves more than just moving legs. It encompasses the subtle shifts in weight, arm swings, head bobbing, and even slight torso rotations that accompany natural human movement. Each of these elements contributes to the overall realism and fluidity of the locomotion.
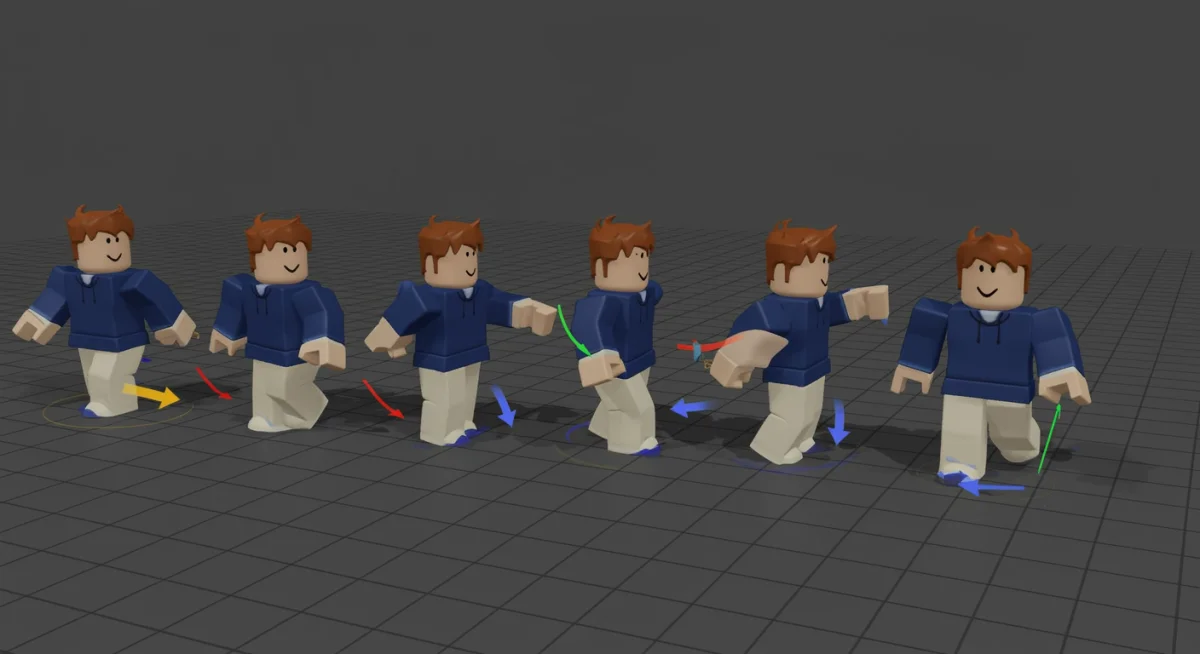
Steps for Creating a Realistic Walk Cycle
A systematic approach to building walk cycles can save a lot of time and lead to better results. Starting with the core poses and gradually adding detail is often the most effective method.
Contact Pose: The moment the foot touches the ground.
Down Pose: The body’s lowest point in the cycle, as weight settles.
Passing Pose: One leg passes the other, body at its highest point.
Up Pose: Character begins to push off the ground, preparing for the next step.
Breakdown Keyframes: Add intermediate keyframes between these main poses to smooth out the transitions.
Consider the personality of your character when animating their walk. Is it a confident stride, a hurried dash, or a casual amble? The speed, stride length, and overall energy of the walk cycle should reflect these traits. Using reference videos of people walking can be incredibly helpful for capturing these nuances. Don’t forget to animate the arms and head, ensuring they swing naturally and react to the body’s movement. Overlapping action is particularly important here.
Once the basic walk cycle is established, pay attention to loopability. A seamless loop is essential for continuous locomotion, avoiding jarring hitches or skips when the animation repeats. Test your animation repeatedly in-game to catch any imperfections that might not be obvious in the editor.
Optimizing character locomotion extends beyond just walking. Running, jumping, and idling animations also require similar attention to detail and adherence to animation principles to ensure a cohesive and believable character movement system within your Roblox game.
Advanced Animation Techniques and Tips
Once you’ve mastered the fundamentals, exploring advanced animation techniques can push your Roblox creations to the next level. These techniques often involve more intricate use of the Animation Editor and a deeper understanding of how to influence player perception through motion.
Advanced techniques aren’t about making things overly complicated, but rather about finding clever ways to add subtle details and polish that distinguish professional animations from amateur ones. This includes considerations for performance, modularity, and dynamic responsiveness.
Leveraging Inverse Kinematics (IK) and Layering
Inverse Kinematics (IK) simplifies animating complex joint chains, like arms or legs. Instead of rotating each joint individually, you can move an end effector (like a hand or foot), and the IK system automatically calculates the necessary joint rotations. While Roblox Studio’s built-in IK is somewhat limited, understanding the concept can inform your manual animation process or inspire custom scripting solutions.
Layered Animations: Combine multiple animations to create complex movements. A character could be walking (base layer) while simultaneously waving (upper body layer).
Animation Blending: Smoothly transition between different animations, preventing abrupt changes in character posture or movement.
Procedural Animation: Use scripts to generate or modify animations in real-time, adding dynamic elements like subtle idle breathing or reactive physics.
Another advanced tip involves utilizing animation events. These are markers within an animation that can trigger scripts at specific points, allowing for perfectly synchronized sound effects, particle effects, or changes in gameplay state. For example, an animation event could play a ‘footstep’ sound exactly when a character’s foot hits the ground.
Furthermore, consider the performance implications of your animations. While Roblox handles much of the optimization, overly complex animations with too many keyframes or parts can impact game performance. Striking a balance between visual quality and efficiency is essential for a smooth player experience.
By integrating advanced techniques like layered animations, thoughtful blending, and the strategic use of animation events, you can create a rich tapestry of movement that makes your Roblox characters feel more alive and responsive than ever before.
Troubleshooting Common Animation Issues
Even experienced animators encounter challenges. Knowing how to effectively troubleshoot common animation issues in Roblox Studio can save a significant amount of time and frustration. Many problems stem from fundamental misunderstandings or simple oversight.
Identifying the root cause of an animation problem is often the hardest part. Is it an issue with keyframe placement, easing, conflicting animations, or perhaps something with the character rig itself? A systematic approach to debugging is key.
Solving Stiff Movements and Glitches
Stiff or robotic movements are frequently a result of insufficient easing or too few keyframes. Reviewing your easing curves and adding more intermediate keyframes can often resolve this. Glitches, such as parts snapping abruptly, might indicate issues with keyframe values or accidental interpolation errors.
Check Easing: Ensure appropriate easing types are applied to all movements; linear easing often leads to stiffness.
Review Keyframes: Look for sudden jumps in position or rotation values between adjacent keyframes.
Verify Rigging: Ensure your character model is properly rigged with correctly oriented joints and no detached parts.
Test in-game: Animations can behave differently in the editor versus actual gameplay. Always test.
Another common problem is animation priority. If multiple animations are playing simultaneously, those with higher priority will override those with lower priority. Understanding and correctly setting animation priorities (e.g., Idle, Movement, Action, Core) is crucial for preventing unwanted animation conflicts and ensuring the correct animation plays at the right time.
Sometimes, issues can arise from the scale of your character or the environment. Discrepancies in scale can make movements appear either too fast or too slow, requiring adjustments to animation timing. Always ensure your character’s proportions are consistent with the intended animation style.
By systematically checking for these common pitfalls and understanding how the different animation components interact, you can effectively troubleshoot and refine your Roblox animations, leading to a much smoother and more polished final product.
Future-Proofing Your Roblox Animations
As Roblox Studio continues to evolve, so too do the possibilities and best practices for animation. Future-proofing your animations involves adopting modular design, staying updated with new features, and thinking about how your animations can adapt to potential changes in your game or the platform itself.
A forward-thinking approach ensures that your animation assets remain usable and easily modifiable, reducing the need for complete overhauls when updates occur or new gameplay mechanics are introduced. This also makes collaboration with other developers much smoother.
Modular Animation Design and Version Control
Designing animations in a modular fashion means breaking down complex actions into smaller, reusable components. For example, instead of one giant ‘attack’ animation, you might have separate animations for ‘wind-up,’ ‘strike,’ and ‘recovery.’ This allows for greater flexibility and easier adjustments.
Animation Packs: Organize related animations into logical groups for better management.
Naming Conventions: Use clear, consistent naming for all your animation assets to avoid confusion.
Version Control: Utilize systems like Git or Roblox’s built-in asset versioning to track changes and revert if necessary.
Parameter-driven Animations: Explore using scripts to dynamically adjust animation speed or blend weights based on in-game parameters.
Staying informed about Roblox Studio updates is also critical. New animation features, improvements to the Animation Editor, or changes to the character rigging system can significantly impact your workflow and the techniques you use. Regularly checking the Roblox Developer Forum and official documentation will keep you ahead of the curve.
Furthermore, consider the scalability of your animations. Will they still look good if your character changes size, or if new accessories are added? Designing with adaptability in mind can save considerable effort down the line. Creating generic animations that can be easily retargeted or adjusted for various character types is a valuable skill.
By embracing modularity, maintaining clear organization, and staying abreast of platform advancements, you can ensure your Roblox animations are not only high-quality today but also robust and adaptable for the future of your game development.
Key Technique
Brief Description
Keyframes & Easing
Define extreme poses and control acceleration/deceleration for fluid motion.
Animation Principles
Apply concepts like squash/stretch, anticipation, and arcs for realism.
Walk Cycle Optimization
Focus on contact, down, passing, and up poses for natural locomotion loops.
Modular Design
Break down animations into reusable components for flexibility and future adaptability.
Frequently Asked Questions About Roblox Animation
What is the best way to start learning Roblox animation?▼
Begin by familiarizing yourself with the Roblox Studio Animation Editor. Practice setting basic keyframes for simple movements like waving or jumping. Utilize official Roblox documentation and community tutorials to grasp fundamental concepts before moving to complex animations.
How can I make my Roblox character movements less stiff?▼
To reduce stiffness, focus on using easing functions like Ease In/Out between keyframes. Add more intermediate keyframes to create smoother transitions. Incorporate subtle secondary movements and ensure arcs are applied to limb movements, avoiding straight-line motion.
Are the 12 Principles of Animation really important for Roblox?▼
Yes, absolutely. While not all principles are directly implementable, understanding them greatly enhances realism. Principles like anticipation, squash and stretch, and follow through add weight, emotion, and believability to your Roblox character animations, making them more engaging.
How do I handle multiple animations playing at once in Roblox?▼
Roblox uses animation priorities (Core, Idle, Movement, Action). Animations with higher priority will override those with lower priority. Layering animations and using blending techniques also helps in managing complex composite movements without conflicts, ensuring smooth transitions.
What tools or resources can help improve Roblox animation skills?▼
Beyond Roblox Studio’s Animation Editor, external tools like Blender can be used for more advanced rigging and animation, then imported. Online tutorials, communities like the Roblox Developer Forum, and studying real-world movement are invaluable resources for continuous improvement.
Conclusion
Mastering Roblox animation is an iterative journey that combines technical proficiency with artistic vision. By diligently applying these Roblox Animation Tips: Create Smooth and Realistic Movements for Your Characters, you’re not just moving digital puppets; you’re imbuing them with personality and purpose. From understanding the nuances of keyframes and easing to embracing the timeless 12 Principles of Animation, each step refines your craft. Remember to practice consistently, observe the world around you for inspiration, and never shy away from troubleshooting. The effort you invest in creating fluid, believable movements will undoubtedly pay off, leading to more immersive and captivating experiences for your players within the boundless worlds of Roblox.