Roblox Terrain Tips: Realistic Landscapes for Your Games
Discover essential Roblox Terrain Tips for crafting realistic and immersive landscapes in your games, utilizing advanced tools and techniques to enhance player experience and visual appeal.
Por: Pedro Bongiovani em 21 de outubro de 2025
Anúncios
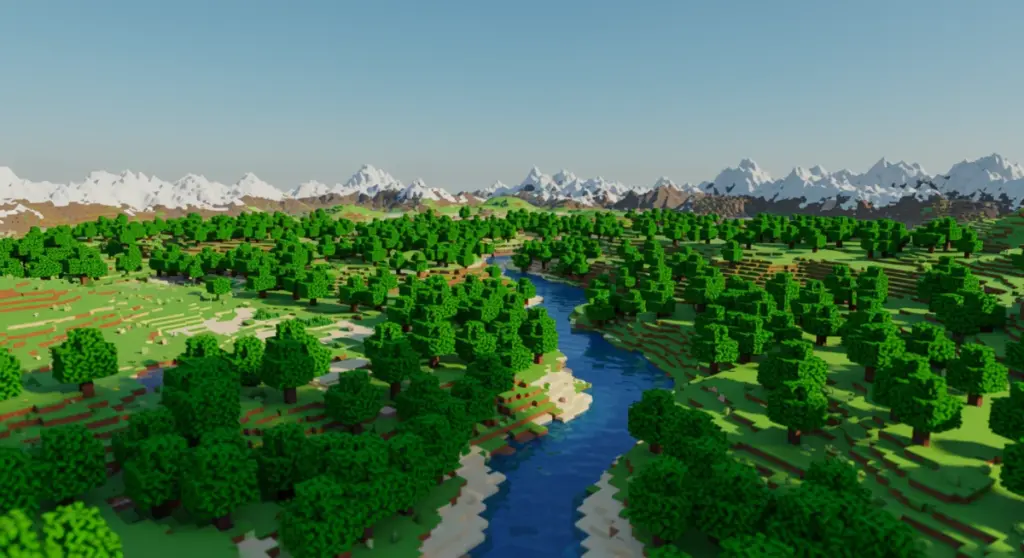
Creating realistic landscapes in Roblox games involves mastering the Terrain Editor and understanding how to blend textures, sculpt forms, and apply environmental details for an immersive player experience.
Are you looking to elevate your Roblox game’s visual appeal and player immersion? Understanding advanced Roblox Terrain Tips is crucial for crafting environments that truly stand out. This guide will walk you through the essential techniques and tools to transform your virtual worlds into breathtaking, realistic landscapes, ensuring your creations captivate and engage players.
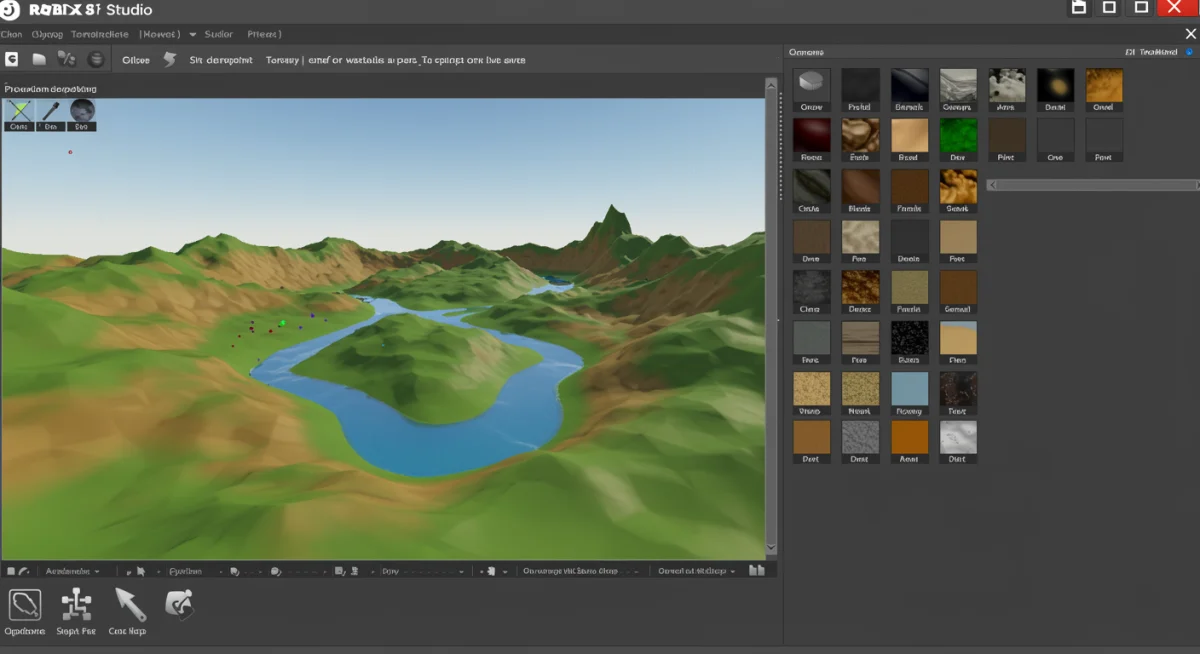
Mastering the Terrain Editor: Your Digital Canvas
The Roblox Studio Terrain Editor is your primary tool for shaping virtual worlds. It’s more than just a set of brushes; it’s a powerful suite that allows for intricate manipulation of your game’s environment. Familiarizing yourself with each tool’s function and how they interact is the first step toward creating truly realistic landscapes.
Understanding the core functionalities of the Terrain Editor is paramount. Each tool serves a specific purpose, from initial broad strokes to fine-tuning details. Learning to switch seamlessly between them and applying them strategically can significantly impact the final look and feel of your terrain.
Essential Terrain Tools for Sculpting
Grow: This tool raises the terrain, ideal for forming mountains, hills, and elevated platforms. Varying its strength can create natural-looking slopes rather than uniform bumps.
Erode: Opposite to ‘Grow,’ ‘Erode’ lowers the terrain, perfect for carving out valleys, rivers, and depressions. It can also be used subtly to add wear and tear to existing structures.
Smooth: A vital tool for blending harsh edges and creating natural transitions between different terrain heights. Overuse can make terrain look artificial, so use it judiciously.
Flatten: Creates flat surfaces at a specific height. Useful for building foundations, roads, or creating plateaus. It’s often used in conjunction with other tools to maintain a natural appearance.
Beyond these basic functions, the Terrain Editor also offers more specialized options. The ‘Paint’ tool allows you to apply different materials like grass, rock, sand, or water, bringing texture and color to your sculpted forms. The ‘Replace’ tool can swap one material type for another across a selected area, which is incredibly useful for large-scale environmental changes. Mastering these tools means not just knowing what they do, but understanding when and how to apply them for maximum effect, creating a cohesive and believable natural environment.
Strategic Material Painting for Visual Fidelity
Material painting is where your landscape truly comes alive, adding texture, color, and visual depth. Simply sculpting shapes isn’t enough; the right materials applied thoughtfully can convey age, climate, and the overall narrative of your game world. This process involves more than just clicking and dragging; it requires an artistic eye and an understanding of natural material distribution.
The default Roblox materials offer a good starting point, but knowing how to blend them and create custom textures can push realism even further. Consider how different biomes would naturally transition into one another, and mimic those patterns in your digital canvas. For instance, a mountain peak might feature more rock and snow, while its base transitions into dirt and grass.
Blending Materials for Natural Transitions
Gradient Blending: Instead of sharp material changes, use a softer brush strength to create gradual transitions between materials. This is especially effective between grass and dirt, or sand and water.
Layering Textures: Think about how different materials would naturally layer. For instance, a rocky cliff might have patches of moss or dry grass clinging to its surfaces. Use smaller brush sizes to add these details.
Contextual Application: Apply materials based on environmental logic. Water bodies should have sand or dirt banks, while dense forests should feature rich soil and fallen leaves. Don’t just paint; tell a story with your textures.
Furthermore, don’t underestimate the power of the ‘Water’ tool within the Terrain Editor. It’s not just for creating oceans; it can form intricate rivers, serene lakes, and even subtle puddles, each with its own unique visual properties. Adjusting water transparency, color, and even wave intensity can drastically change the mood and realism of your aquatic environments. Strategic material painting, therefore, isn’t just about aesthetics; it’s about building a believable world that players can intuitively understand and explore.
Sculpting Organic Forms: Beyond Basic Shapes
Achieving realism in Roblox terrain goes beyond simply raising and lowering surfaces; it involves sculpting organic, natural-looking forms that mimic real-world geology. This means avoiding perfectly symmetrical mountains or uniformly flat plains. Nature is chaotic and irregular, and your digital landscapes should reflect that inherent randomness to appear authentic.
Think about the forces that shape natural environments: erosion, tectonic shifts, and water flow. While you won’t be simulating these complex geological processes directly, you can use the Terrain Editor tools to replicate their visual effects. This involves a delicate balance of aggressive sculpting and subtle refinement to create believable landforms.
Techniques for Organic Terrain Generation
When creating mountains, for example, start with a broad ‘Grow’ brush to establish the general mass. Then, use ‘Erode’ to carve out valleys and gullies, mimicking water runoff. The ‘Smooth’ tool should be applied sparingly, primarily to soften overly harsh edges, not to eliminate all natural irregularities. For hills, consider using a combination of ‘Grow’ and ‘Erode’ with varying brush sizes to create gentle, undulating forms, rather than uniform mounds. The key is to avoid repetitive patterns and introduce subtle variations in height and slope.
For more complex features like canyons or intricate cave systems, you might need to use a combination of ‘Grow’ and ‘Erode’ with smaller brush sizes and higher strengths. Begin by outlining the general shape, then gradually refine the details, adding nooks, crannies, and overhangs. Remember to consider how light would interact with these forms; shadows and highlights play a significant role in conveying depth and realism. Experiment with different brush strengths and sizes to achieve nuanced results, ensuring that each geological feature tells a story of its formation.
Ultimately, sculpting organic forms is an iterative process. It often involves creating a feature, stepping back to assess its appearance, and then making adjustments. Don’t be afraid to experiment, undo, and re-do until you achieve the desired natural aesthetic. The goal is to make players feel like they are exploring a world shaped by natural forces, not by a digital brush.
Leveraging Environmental Details: Foliage and Rocks
Once your basic terrain is sculpted and painted, the next critical step for realistic landscapes is adding environmental details. Foliage, rocks, and various props breathe life into your world, transforming barren land into a vibrant, believable ecosystem. These details provide visual interest, break up monotonous surfaces, and contribute significantly to the overall immersion.
Roblox Studio offers a robust ‘Decoration’ tool within the Terrain Editor, allowing you to automatically place grass, leaves, and other vegetation. However, for true realism, you’ll want to go beyond automatic placement and incorporate manually placed assets and custom models to create a richer, more varied environment.
Adding Depth with Custom Assets
Variety in Foliage: Don’t stick to just one type of tree or bush. Incorporate different species, sizes, and colors to mimic natural biodiversity. Use models from the Toolbox or create your own custom meshes for unique vegetation.
Strategic Rock Placement: Rocks are excellent for breaking up flat areas and adding geological interest. Place them in clusters, along riverbeds, or at the base of cliffs. Vary their size, rotation, and even material to make them appear natural.
Ground Clutter: Small details like fallen leaves, twigs, mushrooms, or even tiny pebbles can make a huge difference. These micro-details contribute to a sense of realism and add visual texture to the ground plane.
Consider the biome you are trying to create. A desert will require sparse, hardy vegetation and weathered rocks, while a lush forest will demand dense trees, undergrowth, and mossy stones. The placement of these elements should also follow natural patterns. Trees often grow in clusters or along water sources, and rocks tend to accumulate at the bottom of slopes due to erosion. By paying attention to these real-world details, you can create a Roblox environment that feels truly authentic and lived-in. The careful selection and placement of environmental details are what elevate a good terrain to a great one, inviting players to explore every nook and cranny.
Optimizing Performance for Smooth Gameplay
Creating a visually stunning and realistic landscape is only half the battle; ensuring it runs smoothly for all players is equally important. An overly complex terrain with too many details or inefficient asset placement can lead to significant lag, detracting from the player experience. Optimization is key to balancing visual fidelity with performance.
Roblox games are played on a wide array of devices, from high-end PCs to mobile phones. Therefore, designing with performance in mind from the outset will ensure your game is accessible and enjoyable for a broader audience. This involves smart asset management, efficient terrain generation, and understanding Roblox’s rendering capabilities.
Key Optimization Strategies
One crucial strategy is to utilize Roblox’s built-in level of detail (LOD) system effectively. For distant terrain, simpler models or less detailed textures can be used, with higher fidelity assets only loading when players get closer. This significantly reduces the rendering burden. Additionally, be mindful of the number of unique meshes and textures you introduce. While variety is good, excessive diversity can increase memory usage. Try to reuse textures and models where appropriate, or combine multiple small meshes into a single, larger one to reduce draw calls.
Another important aspect is the density of your environmental details. While foliage and rocks add realism, placing too many can quickly become a performance bottleneck. Use the ‘Decoration’ tool’s density settings wisely, and manually place larger, more unique assets rather than relying solely on automatic generation for every single detail. Consider using ‘Part’ based terrain for specific, highly detailed areas, as parts can sometimes be more performant than dense voxel terrain for certain structures. Regularly test your game on different devices and with varying graphic settings to identify and address performance bottlenecks early in the development process.
Finally, keep an eye on your game’s memory usage and script performance. While terrain itself is primarily visual, complex scripts interacting with the environment can also impact frame rates. Optimize any scripts related to terrain interaction, such as custom wind effects on trees or water physics. A beautiful landscape that lags is less enjoyable than a slightly simpler one that runs flawlessly. Striking this balance is a hallmark of professional game development.
Advanced Techniques: Beyond the Basics
For those looking to push the boundaries of realism, exploring advanced Roblox terrain techniques can unlock a new level of environmental design. These methods often involve combining the standard Terrain Editor tools with external software, custom scripting, and a deeper understanding of visual effects. Going beyond the basics allows for truly unique and innovative landscapes that stand out in the crowded Roblox ecosystem.
One powerful advanced technique is the use of heightmaps. A heightmap is a grayscale image where different shades represent varying terrain heights. You can generate heightmaps using external terrain generation software (like WorldMachine or Gaea) or even image editing tools, then import them into Roblox Studio. This allows for incredibly intricate and realistic geological formations that would be challenging to sculpt manually.
Integrating External Tools and Customization
Heightmap Import: Create detailed, realistic mountain ranges, canyons, or rolling hills by importing custom heightmaps. This provides a level of precision and natural irregularity difficult to achieve with manual sculpting alone.
Custom Material Variants: While Roblox offers default materials, you can create custom material variants using textures and normal maps to add greater detail. This can make dirt look muddier, rocks more jagged, or grass more vibrant.
Procedural Generation with Scripts: For vast, varied worlds, consider using custom scripts to procedurally generate terrain. This allows for dynamic, infinite landscapes, though it requires coding knowledge and careful optimization.
Post-Processing Effects: Utilize Roblox’s post-processing effects like color correction, blur, sun rays, and depth of field to enhance the visual realism of your terrain. These effects can add atmosphere and depth, making the environment feel more immersive.
Another advanced approach involves leveraging custom mesh parts. While the voxel terrain is versatile, sometimes a specific, highly detailed rock formation, a unique tree, or a complex cave entrance is better represented as a custom mesh. These meshes can be created in 3D modeling software like Blender and then imported into Roblox Studio, allowing for unparalleled detail and control over specific environmental elements. Blending these custom meshes seamlessly with the voxel terrain requires careful texturing and placement, but the visual payoff can be immense. Experimenting with these advanced techniques will undoubtedly set your Roblox game apart, offering players a truly next-level visual experience.
Creating Dynamic Weather and Time Cycles
A truly realistic landscape isn’t static; it breathes and changes with the environment. Implementing dynamic weather and time cycles can dramatically enhance the immersion of your Roblox game, making the world feel alive and reactive. These elements add visual interest, create varied gameplay scenarios, and deepen the player’s connection to the virtual environment you’ve built.
Roblox Studio provides tools and scripting capabilities to create diverse atmospheric effects. From a clear sunny day to a torrential downpour, or the gentle transition from dawn to dusk, these changes can profoundly impact how players perceive and interact with your terrain. The key is to make these transitions smooth and believable, avoiding abrupt shifts that can break immersion.
Implementing Atmospheric Realism
For dynamic time cycles, you can use a simple script to gradually change the Lighting.ClockTime property. This creates a natural progression from day to night, influencing shadows and sky colors. To enhance this, consider altering the Lighting.Brightness and Lighting.ColorShift_Top/Bottom properties to simulate different light temperatures throughout the day. For weather, you can introduce rain or snow effects using particle emitters, paired with sound effects to heighten the realism. Adjusting the FogEnd and FogStart properties can create misty or foggy conditions, adding a layer of mystery or challenge to certain areas of your terrain.
Furthermore, don’t forget the impact of environmental sounds. The rustling of leaves, the distant rumble of thunder, the chirping of crickets at night, or the gentle lapping of water on the shore can all contribute to a more immersive experience. Roblox offers ambient sound objects that can be placed in specific areas or triggered by weather events. Scripting these elements to react to the time of day or current weather conditions will create a cohesive and believable atmosphere. For example, a heavy rainstorm could reduce visibility, make surfaces appear wet and reflective, and be accompanied by the sound of thunder and rain, all of which interact with your beautifully crafted terrain. By integrating these dynamic elements, your realistic landscapes will not only look stunning but will also feel responsive and alive to every player.
Key Aspect
Brief Description
Terrain Editor Mastery
Utilize tools like Grow, Erode, and Smooth for organic, natural landforms.
Material Painting
Blend textures and apply materials contextually for visual depth and realism.
Environmental Details
Add foliage, rocks, and clutter to break monotony and enhance immersion.
Performance Optimization
Ensure smooth gameplay by managing asset density and leveraging LODs.
Frequently Asked Questions About Roblox Terrain
What is the best way to start creating realistic terrain in Roblox Studio?▼
Begin by mastering the basic Terrain Editor tools like Grow, Erode, and Smooth to sculpt primary landforms. Focus on creating organic, varied shapes rather than uniform ones. Experiment with different brush sizes and strengths to understand their impact on the terrain’s appearance. Gradual practice will build your proficiency.
How can I make my terrain look less blocky and more natural?▼
To reduce blockiness, use the ‘Smooth’ tool judiciously to soften sharp edges and blend transitions between different heights. Avoid uniform application; instead, focus on areas that look artificially abrupt. Also, strategic material painting with gradient blending helps to mask any remaining voxel-like appearances.
What are heightmaps, and how do they help create realistic terrain?▼
Heightmaps are grayscale images where pixel intensity defines terrain height. Importing them into Roblox Studio allows you to generate complex, naturally varied landscapes like mountains and valleys with high precision, bypassing manual sculpting for large-scale, intricate formations. They offer a powerful way to achieve geological realism swiftly.
How do I optimize my realistic Roblox terrain for better performance?▼
Optimize by managing asset density, especially for foliage and rocks. Utilize Roblox’s Level of Detail (LOD) system for distant objects. Consider reusing textures and models, and regularly test your game on various devices. Efficient scripting and minimizing unique meshes also contribute significantly to smoother gameplay.
Can I add custom materials or textures to my Roblox terrain?▼
Yes, while Roblox offers default materials, you can enhance realism by creating custom material variants. This involves importing unique textures and normal maps to apply to your terrain, allowing for greater detail and specificity. This advanced technique provides extensive control over the visual fidelity of your landscapes.
Conclusion
Creating realistic landscapes in Roblox is an art form that blends technical proficiency with creative vision. By mastering the Terrain Editor, applying materials strategically, sculpting organic forms, and leveraging environmental details, you can transform your game worlds into immersive, believable experiences. Remember to optimize for performance and consider advanced techniques like heightmaps and dynamic weather to truly set your creations apart. With consistent practice and an eye for natural aesthetics, your Roblox games will undoubtedly captivate players with their stunning, lifelike environments.